Showing posts with label practical. Show all posts

Wednesday, January 19, 2022

Graduation Gift Idea for Boys

 Hey, everyone! Here's a quick little gift idea I did for my brother's graduation gift last year. This can be easily customized. I titled this as a gift for boys, but it could also be a gift for girls too, of course. My gift had four parts:

1. A lunchbox (which my brother was in need of and got to use at an upcoming camp. This could be replaced with a different sort of tote, bag, backpack or suitcase.)

2. A water bottle (again, this was something I knew my brother needed, but could be replaced with a mug or even kitchen appliance.)

3. A card (I hand made mine to make it more personal.)

4. A gift card/certificate (I did one to my brother's favorite smoothie shop, A to Zinc. Go by what you know the person loves, and conceal it inside of the bag/lunchbox.)

That's it! 


If you're looking for a last-minute, easy but personal graduation gift, I hope this comes in handy!


-Lauryn

Share this PostPin ThisEmail This

Friday, January 14, 2022

DIY Director/Teacher Thank You Gift Sets


Hello, happy Friday! Here is a thank you gift idea that is especially great for when you need to make several thank you gifts at once. I made these for my theater directors, choreographer, and stage manager, but they could work for other occasions such as bulk teacher appreciation gifts. This gift sets are very simple to put together. 

Here is what they included:

-Cups (mine were from Walmart)

-Thank You Cards (mine were from Dollar Tree)

-Dishcloths (I bought a set from Walmart)

-Tea/Drink Packets 

-Lip Balm (I bought mine in a set from Marshells)

-Donuts/Treats (again, mine were from Walmart)

-Sandwich Bags 

-Ribbon

-Containers/Baskets (Mine were from Dollar Tree)

Of course, these items could easily be replaced by alternative items based on what the recipient likes. 


I hope you find this helpful!


-Lauryn

Share this PostPin ThisEmail This

Thursday, May 28, 2020

DIY Bird Magnet Party Favors


Hey everyone! I'm finally back. Here is a quick tutorial on how to create bird magnet party favors. These are super easy (meaning they can be made at the last minute if necessary. I know from experience.), practical, fun and pretty inexpensive. They do require several phases of drying time, however. If you substitute the clay I listed below, then they can be even cheaper. I created these for a bird-themed party, but you could create something else to fit your theme or use the bird magnets for a more open-ended theme such as nature, animals, etc. Unfortunately, I did not take photos of the process, so hopefully the instructions make sense. These are overall pretty self-explanatory.

For this project, you will need:
-Polymer Clay (NOTE: The acrylic paint is completely unnecessary if you have the colors of clay you want. I used old clay, so I had to paint on top of it once my birds dried. You can do details with the clay and skip that trouble, though.)
-Acrylic Paint or Nail Polish (I used Apple Barrel acrylic paint)
-Paint Brush(es)
-Clear Gloss (this could be Dollar Tree nail polish or a gloss paint. I like to use one from a local store called The Artful Barn that is only $2 or less, is triple-thick, and works great)
-Magnets (I bought mine in bulk on Amazon for cheap, although they are very miniature so I need to use two on the back of each)
-Adhesive (hot glue did not work for me, so I had to use J.B. Weld epoxy. Don't get it on your fingers, car, clothes, or carpet! I learned the hard way.)

Step 1.
First of all, you need to form the birds out of clay. Roll and squish the clay in your hands until the clay is pliable, then roll it into a ball. You'll want the ball to be just a tad bit wider than a quarter, probably, if that makes sense. Then place the clay down on a plastic plate, parchment paper or anything it won't stain or get stuck to. Use your thumb to press down and make a two-ball snowman shape with a small circle and large circle (all in one piece). Pinch the tip of the small, top circle and pull it to form a beak. Pinch and pull the bottom left part of the large, bottom circle to create a broad tail. Pinch and pull on the bottom of the large circle to create a cylindrical shape and press down so it is rectangular. This should be narrow. At the bottom of this rectangle, pinch both the left and right sides to create feet. The right should be longer than the left if your bird is facing right. You can use a fork, needle or other tool to engrave toes. You can add other details if desired, such as a wing sticking up, a varied head shape, a branch, etc. If you have the right colors, form the eyes, wings, beak, feet, and other different-colored elements and stick them on, making sure the edges are securely combined, and skip Step 2. I did not do this, so I will describe my process in Step 2. Bake the clay at around 275 degrees for around thirty minutes. This is a vague estimate, and ovens vary.

Step 2.
Once the clay has hardened and cooled off completely, coat the bird in the acrylic paint or nail polish color of choice. If you use paints, this may take three coats, involving each to dry before adding a new coat. Once that is dry, use black to paint on tiny dots for the eyes, and use black or another color of choice to paint a simple wing shape, the feet, the beak, and any details or designs you wish to add. I went for a very minimalist, graphic-design look, so my birds are highly unrealistic and more whimsical. To save time, you could paint the backs of the magnets plain black. Let the paint dry.

Step 3.
Add a coat of clear gloss to one side, let that dry, then do the other side and let that dry.

Step 4.
Glue on the magnets. Hot glue was not strong enough for my magnets to I used J.B. Weld epoxy. I had to mix two different parts together, and I used a popsicle stick. Then, with the popsicle stick, I dabbed two spots of glue for two magnets on the back of each bird, rubbed some on one side of each magnet, and stuck the magnets on. Do NOT get J.B. Weld or super glue on your skin or anything but this project! Let that dry, and you're done!

To package the magnets, I cut out squares of card-stock and wrote "You're a mother like no other!" You could substitute 'mother' for any word befitting your purpose. At the bottom I wrote "Happy Mother's Day!" I just used a regular gel ink pen. Even a decent ball-point pen could work. I tied them on with string or twine, and punching holes into the card-stock to tie the string through is highly recommended.


I hope you find this useful! I have a lot of events to share soon! 

-Lauryn

Share this PostPin ThisEmail This

Thursday, February 13, 2020

DIY Energy in a Jar Gift

Hello, everyone! This is a rather random post since Valentine's Day is tomorrow, but I plan to share an extra post for Valentine's Day either later today or tomorrow, so stay tuned! For now, I'd like to share a quick, easy gift tutorial that is very practical but can be stylish and tasy,  too! For a recent birthday, I did an Energy-in-a-Jar gift. I found this unique gift idea several years back here: https://www.thegunnysack.com/everything-in-jar-handmade-gifts/.
Along with that, I added another snack, lotion and a water bottle. For my Energy-in-a-Jar gift, I included the following:
-Trail Mix (from Dollar Tree)
-Larabars (from Walmart)
-Forrero Rocher Chocolates (from Dollar Tree)
That was all I could squeeze in my jar, but I added more trail mix and snacks to the gift bag along with the items I listed above. This is a great gift for any busy, hardworking people. Hopefully you find this gift idea as handy as I did! 


Thanks for visiting! 

-Lauryn

Share this PostPin ThisEmail This

Tuesday, August 6, 2019

"Super" DIY Father's Day Gift

Hey, guys! Here's a super easy, practical, cheap and punny gift that you can make, back from Father's Day. However, with a slight text modification, this gift for men could work for any occasion (birthday, Christmas, etcetera). 


To make this, you will need:
-Super Glue ($1 at Dollar Tree)
-Trail  Mix ($1 per bag at Dollar Tree)
-Candy (optional) ($1 at Dollar Tree)
-A Mason Jar (I buy them in bulk at Walmart so they cost under $1)
-A gift basket (I got a pack of 3 for $1 at Dollar Tree)
-The free printables below

Step 1. 
Print out the free printable card below. Fold it in half. Writing a personal message on the inside is recommended. Alternatively, you could create your own card.
Step 2. 
Pour the trail mix(es) and candy into a bowl and mix, then pour the mix into a jar. 
Step 3. 
Place everything in a basket and arrange them to perfection. How easy was that?


There you have it, a funny, thoughtful yet quick gift for men, for under $5. Enjoy!


Free Printables:


-Lauryn
Share this PostPin ThisEmail This

Friday, January 11, 2019

The Perfect DIY Gift for Literary Tea-Lovers


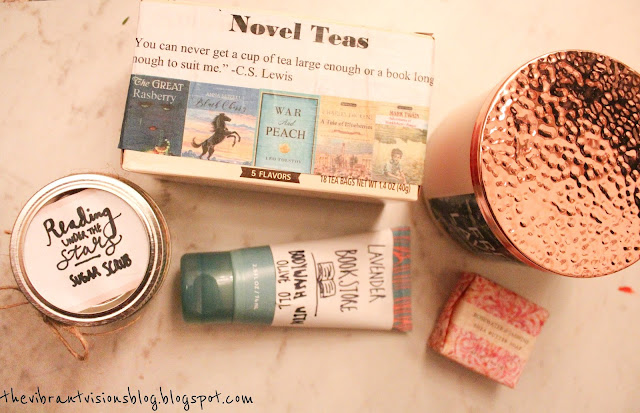
Hello, everyone! This gift is perfect for the bookworms/tea-lovers in your life. I made this for my great grandmother, and it is specially handmade while remaining practical (and tasty). I was inspired by products sold online, book-lover teas and a bag of 'Novel Teas', so without further ado, here is my DIY version.

To make it, you will need:

-A box of a variety of teas (if you plan to use my printables, you will need raspberry, peach, black cherry, blueberry, and berry zinger flavors. I think mine was under $3 from Walmart).
-The free printables below (unless you make your own).
-A printer and ink for the printables, of course
-Scissors
-Twine
-Glue (I used Elmers, but a glue stick is best) 
-A clear gloss (I may have used Modpodge, but acrylic gloss is better)

Printable:

Teabag Printables:


Step 1. 
Print out the label for the box.
Step 2. 
Cut it out to the correct size, stick it on with a glue stick and add a clear gloss on top. 
Step 3. 
Remove the tea bags. Print and cut out the book covers. You will need to download and save the pictures to your photos, then right click (when you're in your computer's photo library) and select 'print' or 'Print...' Then you will need to change the settings. There should be an option that allows you to print several of the same image on one paper. I chose to print about nine per page, but this will depend on the size of your paper. Hopefully that makes sense. An alternative option is to open it in a collage-editor program and print them as grid collages. 
Step 4.
Tie the covers on the right-flavored tea bags using twine. Make sure your hands and work space are clean. Needless to say, do not use glue, or the recipient can't drink with them!
Step 5.
Put the tea bags back. You're done!


I added mine to a gift box with homemade "Reading under the Stars" sugar scrub and made a homemade label for a Bath and Body Works product to turn it into a lavender "bookstore" scent. I also added soap and a candle from Erwin Rush and Bath and Body Works, and put everything on a dishcloth. Have fun crafting!

-Lauryn
Share this PostPin ThisEmail This

Saturday, December 29, 2018

My "Christmas Movie Night in a Box" Gift


This was a gift idea that has been all over Pinterest for a few years. I decided to make it for my grandfather, who is very tricky to come up with gifts for and likes movies. To make my version, you will need:
-A box of popcorn
-Candy (mine was Reeses)
-Hot cocoa mix or packets
-Trail mix or an alternative treat
-Chocolate (I used a mini sampler box, mostly because of the adorable box)
-Scrapbook paper/labels
-A pen/marker
-A card and money (optional)
-Mason jar and string/twine/ribbon (optional)

I used a small, Christmas cardstock pad I bought on sale at Michaels. I cut a big sheet out and glued it onto the popcorn box to prettify it. I wrote "Movie Theater Extra Butter Popcorn" since that was what the box read. I glued a matching cardstock trim onto the bottom of the Reeses box. I poured the trail mix into a mason jar, and tied a matching cardstock tag on with twine. I added a circle of the cardstock on the lid and wrote the trail mix title on it. Then I wrote a card and included $2 for a Redbox movie. It's a great last-minute option if you're pressed for time, too. The total price for mine was under $9. It wasn't too cheap but it wasn't too terribly expensive, either. 


Hopefully this will help give you ideas for adult movie-lovers next Christmas!

-Lauryn

Share this PostPin ThisEmail This