Showing posts with label gift in a jar. Show all posts

Thursday, February 13, 2020

DIY Energy in a Jar Gift

Hello, everyone! This is a rather random post since Valentine's Day is tomorrow, but I plan to share an extra post for Valentine's Day either later today or tomorrow, so stay tuned! For now, I'd like to share a quick, easy gift tutorial that is very practical but can be stylish and tasy,  too! For a recent birthday, I did an Energy-in-a-Jar gift. I found this unique gift idea several years back here: https://www.thegunnysack.com/everything-in-jar-handmade-gifts/.
Along with that, I added another snack, lotion and a water bottle. For my Energy-in-a-Jar gift, I included the following:
-Trail Mix (from Dollar Tree)
-Larabars (from Walmart)
-Forrero Rocher Chocolates (from Dollar Tree)
That was all I could squeeze in my jar, but I added more trail mix and snacks to the gift bag along with the items I listed above. This is a great gift for any busy, hardworking people. Hopefully you find this gift idea as handy as I did! 


Thanks for visiting! 

-Lauryn

Share this PostPin ThisEmail This

Saturday, January 5, 2019

DIY Grinch Play-Doh Kit


Here is a super easy, fun Grinch-themed Play-Doh kit. This is a pretty simple gift that is especially perfect for toddlers. What child doesn't love Play-Doh? Plus it's themed around a classic movie/book favorite! 

To make this kit, you will need:

-A regular-Mason-sized jar
-Pom-poms 
-Pipe Cleaners
-Googly Eyes
-Two Play-Doh Colors (I went with red and green)
-Clear Favor Bags
-Polymer Clay
-Mini Rubber Bands 

Step 1. 

Trim the pipe cleaners so that they can fit inside of the jar. Tie them in a bundle with a rubber band.

Step 2.

Remove the Play-Doh from the containers and place them in two separate party favor bags. Mine were mini, but trim the excess plastic if you buy regular-size bags. Seal them with mini rubber bands.

Step 3. 

Put the pom-poms and googly eyes in their own bags, tied with rubber bands too, unless they come in a small package already. 

Step 4. 

Take your Polymer clay and sculpt Cindy Lou, Max, and the Grinch. I'm afraid I didn't take photos of the process so I can't go into detail, I just looked at pictures and winged it. By the way, i did mine sitting because he wouldn't stand, but make sure everything is attached well, because my legs and Cindy's antennas broke off afterward. Now he's a Veggietale character, "The Spinach That Stole Christmas". That works, right? Cook them according to the package. After they cool, if you didn't use the right colors, paint them with acrylics or nail polish. Draw the eyes and facial details with a Sharpie or gel ink pen. Coat them with a clear nail polish or other gloss finish. 

Step 5. 

Put everything in the jar, and you're finished!


I hope that you enjoyed! I have more gift tutorials on the way!


-Lauryn
Share this PostPin ThisEmail This

Thursday, January 5, 2017

DIY Unicorn Play-Doh Kit in a Jar

Here's a handmade gift I came up with for my cousin, who's four. This tutorial is fairly simple, and this gift is both cheap and fun.


To make this kit, you will need:
-A Jar
-A Unicorn Figurine
-Play-Doh ($0.50 at Walmart)
-Little Jewels, gems, glitter, or anything you have on hand that seems fitting (I also used finger-nail jewels and bows)
-Gold Paint (either acrylic or spray paint)
-Hot Glue Gun
-Hot Glue Gun Sticks

Step 1. First of all, hot-glue the unicorn to the lid of the mason jar. I made my unicorn from polymer clay scraps.
Step 2. Paint the lid (unicorn and all) gold using acrylic paint, or bring it outside and spray paint it using plastic bags or something to protect the ground.
Step 3. Remove the Play-Doh from any containers, place each color, one-at-a-time, in the jar using parchment paper to separate the colors.
Step 4. Package your accessories such as glitter, jewels, sequins, and such individually. These go on top of the Play-Doh in the jar.
Step 5. Twist the lid on, and you're done!


I hope that this tutorial makes some little girls very happy!

-Lauryn


Share this PostPin ThisEmail This

Wednesday, December 21, 2016

Christmas Gift Review, 2015

Only four more days until Christmas!! Today I want to go back to last Christmas and show you some of my gifts. Sorry about  the blurry photography; please keep in mind that I didn't have a DSLR camera at the time. I listed 12 of my handmade gifts below. I hope you find inspiration!


1. For my cousin, who was two, I made a mini snow globe. All you do to make one is hot-glue something to the lid, put glitter in a baby food jar, fill it with water, and tightly twist the lid on.

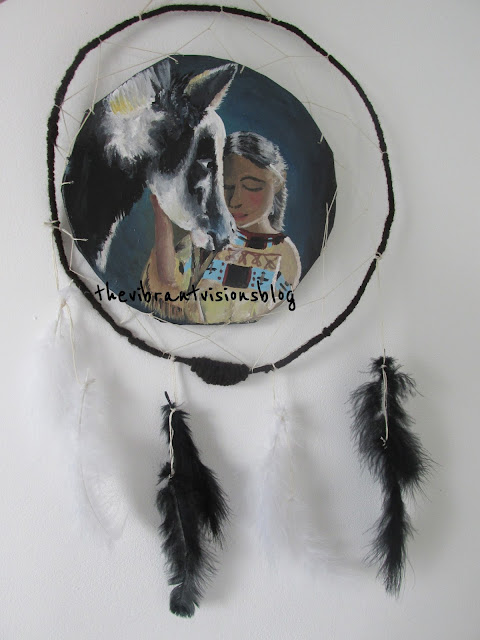
2. For my grandmother, I made this dream-catcher. Maybe I'll do a tutorial in the future.

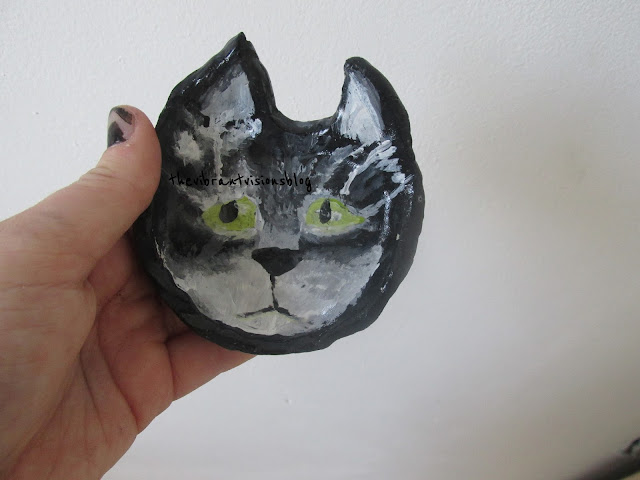
 3. For my art teacher (who is a cat-lover), I made this jewelry dish out of clay and hand-painted it with acrylics. I also added a gloss on top.

4. For my grandmother I made this 'Christmas Memories in aJar' using this tutorial.

 5. For my grandfather, I made this coaster out of clay, painted it with acrylics and added a clear coat. It turned out to not be very liquid-proof, though.

6. For my brother I created a 'Build a Fort' kit. There are countless versions and tutorials online.

7. For each of my brothers I made wooden slingshots made from sticks, rubber bands, glue, and felt. I painted the sticks and gave them pom-poms to shoot. Be careful if you use a pocket knife to smooth out the branch, though. I have a nice scar to remember creating them by.

8. For my younger cousins, I made this character watercolor-and-pen artwork of Mario, Luigi and Toad.

9. For my great-grandfather, I drew this picture of himself.

10. For my grandmother, I drew these birds.


11. For my great-aunt, I made this typography picture.

12. For my two-year-old cousin I made this easy hair elastics with this tutorial.


All of the above artwork can be seen on my business website's art gallery here. I hope you enjoyed! I'll soon be doing a Christmas party post!
-Lauryn
Share this PostPin ThisEmail This

Thursday, October 13, 2016

DIY Birthday in a Jar Gifts

Here's my version of the popular 'Birthday-in-a-Jar' gifts all over Pinterest. I actually did two that had themes for two of my cousins. One theme is 'Happy' and the other is 'Woodland.' You can see everything I put in them and I typed a list of everything included below.


In each jar, there is:
-A crown
-A candle
-A toy
-And in one there is a happy-face balloon; in the other is a bag of handmade confetti.


This cute gift is simple, not too expensive, and fun! The balloon is from Hobby Lobby, I got a big pack of mini candles at Dollar Tree, from which I got the neon green candles, the confetti was made by cutting circles out of brown paper, and the felt crowns were made with felt from Walmart, hot glue, and elastic that was both sewed and glued on. I stiffened the felt with Elmer's glue on the back. I also filled the jars with some brown paper grass I had on hand. Have fun!


Share this PostPin ThisEmail This