Showing posts with label literary. Show all posts

Friday, January 11, 2019

The Perfect DIY Gift for Literary Tea-Lovers


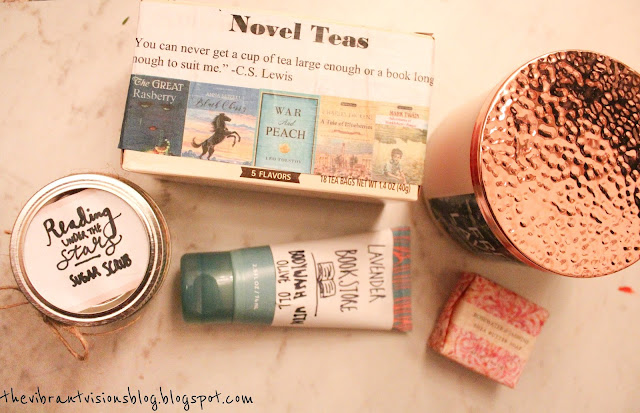
Hello, everyone! This gift is perfect for the bookworms/tea-lovers in your life. I made this for my great grandmother, and it is specially handmade while remaining practical (and tasty). I was inspired by products sold online, book-lover teas and a bag of 'Novel Teas', so without further ado, here is my DIY version.

To make it, you will need:

-A box of a variety of teas (if you plan to use my printables, you will need raspberry, peach, black cherry, blueberry, and berry zinger flavors. I think mine was under $3 from Walmart).
-The free printables below (unless you make your own).
-A printer and ink for the printables, of course
-Scissors
-Twine
-Glue (I used Elmers, but a glue stick is best) 
-A clear gloss (I may have used Modpodge, but acrylic gloss is better)

Printable:

Teabag Printables:


Step 1. 
Print out the label for the box.
Step 2. 
Cut it out to the correct size, stick it on with a glue stick and add a clear gloss on top. 
Step 3. 
Remove the tea bags. Print and cut out the book covers. You will need to download and save the pictures to your photos, then right click (when you're in your computer's photo library) and select 'print' or 'Print...' Then you will need to change the settings. There should be an option that allows you to print several of the same image on one paper. I chose to print about nine per page, but this will depend on the size of your paper. Hopefully that makes sense. An alternative option is to open it in a collage-editor program and print them as grid collages. 
Step 4.
Tie the covers on the right-flavored tea bags using twine. Make sure your hands and work space are clean. Needless to say, do not use glue, or the recipient can't drink with them!
Step 5.
Put the tea bags back. You're done!


I added mine to a gift box with homemade "Reading under the Stars" sugar scrub and made a homemade label for a Bath and Body Works product to turn it into a lavender "bookstore" scent. I also added soap and a candle from Erwin Rush and Bath and Body Works, and put everything on a dishcloth. Have fun crafting!

-Lauryn
Share this PostPin ThisEmail This

Thursday, October 25, 2018

Easy Matilda Costume Idea


Here is a super easy tutorial for a Matilda costume from Roald Dahl's book. You probably have the materials on hand already, but if not they are easy to find, and this costume takes only a few minutes to throw together. All that you need is a blue dress, preferably with half-sleeves or long-sleeves. I had mine from a thrift store sale. I suggest you carry a book or two, or a some other element from the story so that people know what character you are. This costume is very quick, and Matilda is a great literary character from an enjoyable classic. This costume is especially good for those who are looking for a costume at the last minute. Not to mention that it isn't too over-the-top, so you could even wear it to work or school.


Here is an illustration by Quentin Blake from quentinblake.com:

I hope you enjoyed! I have more costumes to share, including another Roald Dahl costume, so I'll post again soon!

-Lauryn

Share this PostPin ThisEmail This

Monday, September 10, 2018

DIY Gandalf Costume

Hey, guys! Here's another costume tutorial, this one for Gandalf the Grey. I will warn you that it's not entirely handmade, and my only contribution was the hat, but I still thought you would like me to share. My mother mostly created it. I like to think that it's from the book because I adore the books and detest the movies, but it looks like the movie-version of Gandalf, so if you are doing the book-version, just change the colors (for instance, I think that the hat is supposed to be blue). It's super easy to make, especially if you don't sew. Anyway, I hope you enjoy!


Materials:

-Gray pants and shirt
-Gray beard
Gray fabric for the cloak
-Gray or blue acrylic paint
-Cardboard
-Newspaper or some other thin paper
-Scissors
-Tape (preferrable duct tape or electric tape)
-Supplies for paper mache glue (flour, water and glue)
-A staff, which could be something recyled, a smoothed-out stick or whatever you have on hand.

Step 1.

Cut out your cloak in a rectangle. Hem the edges, or if your like me, just hot glue the edges or leave them as they are. Gather the top into a hood-form and sew the front so that it stays in a hood-shape.

Step 2. 

Create a paper mache hat by using this tutorial, only make a cone-like form instead of the cylinder, of course.

Step 3. 

Buy the clothing materials if you haven't yet or don't have gray clothes and a beard on hand. Don't forget to find a staff. You're done! It's as simple as that!


Hopefully you found this handy! Throughout September and October I hope to also share Galadriel, Lucy Pevensie, Charity, Moana, Toad, and Belle costume tutorials, among many others!

-Lauryn
Share this PostPin ThisEmail This