Showing posts with label punny. Show all posts

Monday, July 13, 2020

DIY Easy Nutella Gift

Hey guys! Today I have a super quick and easy gift tutorial for any chocolate-and-peanut-butter lovers you know. If you are scrambling for some last minute ideas, this hopefully will come in handy! This could go for any type of butter, too. Almond, cashew, plain peanut butter, apple butter, and so on. This could even be just an addition to a gift basket or some other gift (as it was in my case).

All you need is:
-A Spoon (I chose metal because I planned to metal-stamp it but that didn't work out, but any kind would work)
-A Jar of Butter/Nutella
-Paper (for the label, preferably cardstock)
-A Ribbon or Alternative String
-Scissors
-A Pen/Marker
-Tape/Glue (almost any adhesive would do)

I don't even need to break this into steps as the gift is very self-explanatory. All you need to do is create the label by cutting out a circle, write "There's no 'butter' _______(fill in the blank) in the world!" or "than you!" followed by "Happy ____(fill in the blank occasion)!" You could tape or glue this onto the lid. Tie the spoon onto the ribbon or string and tie that into a bow around the mouth of the jar. That's all there is to it! 


I hope this comes in handy! Thank you for visiting! 

-Lauryn 

Share this PostPin ThisEmail This

Thursday, February 20, 2020

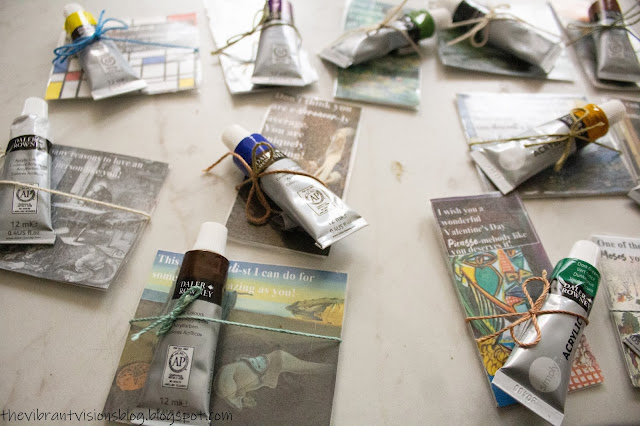
DIY Art History Valentines + Free Printable


Hello, everyone! I'm sorry this post is coming to you later than usual and that I couldn't finish it before Valentine's Day. However, these puns could come in handy for any day, and maybe will provide inspiration for more art history gifts/cards, in addition to being a resource for you next year. I made these puns and came up with the art history theme while doing a huge art history project for my art education classes (called "the mammoth project" for a reason!), and most of the puns came to me while I was in bed around midight (isn't that when all the best ideas come?). These are super easy to make, at least for the most part. If you have a laminator I imagine the process is way easier, but I cut, peeled and stuck together my laminate paper by hand. These cost probably around $0.75 each if the ink, paint tubes, paper and laminate are all included, but not counting the extra paper and supplies left over. To clarify: I am not calculating and adding the cost of paper, ink, and the roll of laminate, but estimating based on the amount used of those items. I normally would do cheaper valentines, but I only needed around ten this year, plus I didn't realize how much they would add up to. You could modify this to be more cost-efficient.

Here is what you will need:
-Tubes of Paint (or some artistic material)
-Laminate Paper
-White Cardstock
-A Printer and Colored Ink
-The Free Printable Below
-String or Tape (or some material you have on hand to hold the paint/alternative to the card)
-A Pen 
-Playing Cards (optional)
-A Glue Stick
-Scissors

Step 1. 
Printout the printables below onto white cardstock and cut them out.

Step 2. 
If you use playing cards, glue the picture onto one side of each card with a glue stick and cut an equal-sized peice of white cardstock to glue to the other side (so the card is sandwiched in between). The card just reinforces sturdiness. Whether or not you use playing cards, the back is white. Write a message on the back with your pen (preferrably black gel ink, a simple message like "Happy Valentine's Day!") and sign your name. 

Step 3. 
Laminate the cards. 

Step 4. 
Tie, tape or somehow adhere the paint tubes (or alternative media) to the cards, preferrably with an adhesive that will not mess up the cards when removed. You are done! 


Here are the free printables:


If you have difficulty downloading them, just right-click, select 'Open image in new tab' and you can print it from the new tab from the right-hand corner options.

I hope you enjoyed this tutorial!

-Lauryn
Share this PostPin ThisEmail This

Friday, October 11, 2019

"The Phantom Tollbooth" Birthday Party


Hello, everyone! I'm super excited to reveal my brother Will's 11th birthday party (one of them, that is; I will share the other soon!), which was themed around one of the best books ever, The Phantom Tollbooth by Norton Juster. I hand-drew the map from the book and the poster outside with a party-fied version of the cover image (featuring Milo and Tock). The banner of characters was created by printing collages I made of images gathered online, cutting them out, and gluing them onto string. The four small, blue dishes, which I forgot to fill, I handmade in my ceramics class at my school. I drew the Dodecahedron's face and stuck it onto an actual glass dodecahedron. I didn't do the other faces because I wanted to keep the elegant glass look while representing the character. I also made the bottles of noises by writing on peel-and-stick labels, filling the jars with water and sprinkling in glitter. The cookie cake was homemade by my mother, and I frosted the picture. For the Do-It-Yourself letter snacks, I bought letter cookies from Walmart. I made the Tock centerpiece in a sculpture class by sculpting clay around a clock from a thrift store and drawing with permanent marker. For favors, the guests each got a notebook, pencil, noise pills, light meals, and whistles. The notebooks were made with the pack of 3 for $1 or less at Walmart and printed images which I cut out and glued to the backs (making them the fronts). For the light meals, I cut out plates and wrote messages like "A Light Meal for you!" By the way, a lot of this probably makes no sense if you haven't read the book, but they're all references. The label pointing to the pencils read "Your Own Magic Staffs. 'Use them well and there is nothing they cannot do for you.'" That's a quote from the book. I came up with bubble wrap favors to go with the section about Kakofonous A. Dischord (the A stands for As Loud As Possible, by the way). I folded sheets of bubble wrap and stapled on labels that read "Noise Pills | Cures you of lack of noise. Just pop one capsule per moment of silence." The whistles were kind of relevant to the whole noise section of the book (I hope), so I added those, too. I also drew masks with card stock and scrapbook paper for every guest. There's a picture of everyone wearing them at the end. They were supposed to be kind of fun and silly, but the masks together looked very disturbing and creepy, honestly. For an added decoration I put up my Phantom Tollbooth Dream-catcher I made in sculpture, as well. At the front door, before they come in, I set up a table where they could take a 'reason'. The sign read "Welcome! You can't get in without a reason. Take a reason over here. These are good reasons for just about anything --a bit used, perhaps, but still perfectly serviceable." I wrote on the reasons things like "Why not?", "Because", "I wish to", "I must", and so on. I made them with gold-painted cardboard that I wrote on with pen and hot glue. I had to make the chains with hot glue because actual chains were too costly and string wouldn't do because the book specifies that the reason was on a gold chain. I made a suitcase with paper, tape and a cardboard box because the guard is supposed to dig the reason from a suitcase. I was very particular about sticking to the book the best I could.


I really hope you've read The Phantom Tollbooth because it's an amazing, hilarious book, and if you have (or once you have), hopefully this will give you some ideas for your own party. I hope you've enjoyed! Visit again soon for more tutorials and a "Jurassic World"-themed party!

-Lauryn
Share this PostPin ThisEmail This