Showing posts with label artistic. Show all posts

Thursday, July 7, 2022

"Bandtastic" Birthday Party

 Hello! Today I'd like to share a birthday party I did for my grandfather back in March or April themed around bands because I was struggling to come up with themes but knew he liked some bands. We used to play a band game, which kind of gave me the idea. I hand-drew the poster and banner, cut out guitars and instruments to decorate, and used musical-themed objects I found around my home for display. I went for a modern, neutral palette featuring brown, black, white and gold with loose contour-type sketches on the banner and poster for an artsy look.


Thanks for stopping by!

-Lauryn

Share this PostPin ThisEmail This

Thursday, February 20, 2020

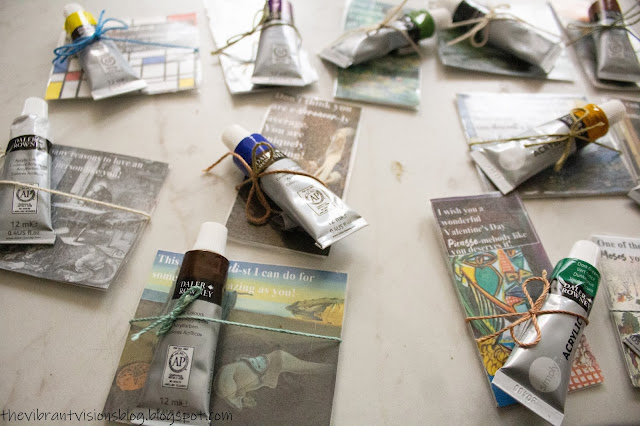
DIY Art History Valentines + Free Printable


Hello, everyone! I'm sorry this post is coming to you later than usual and that I couldn't finish it before Valentine's Day. However, these puns could come in handy for any day, and maybe will provide inspiration for more art history gifts/cards, in addition to being a resource for you next year. I made these puns and came up with the art history theme while doing a huge art history project for my art education classes (called "the mammoth project" for a reason!), and most of the puns came to me while I was in bed around midight (isn't that when all the best ideas come?). These are super easy to make, at least for the most part. If you have a laminator I imagine the process is way easier, but I cut, peeled and stuck together my laminate paper by hand. These cost probably around $0.75 each if the ink, paint tubes, paper and laminate are all included, but not counting the extra paper and supplies left over. To clarify: I am not calculating and adding the cost of paper, ink, and the roll of laminate, but estimating based on the amount used of those items. I normally would do cheaper valentines, but I only needed around ten this year, plus I didn't realize how much they would add up to. You could modify this to be more cost-efficient.

Here is what you will need:
-Tubes of Paint (or some artistic material)
-Laminate Paper
-White Cardstock
-A Printer and Colored Ink
-The Free Printable Below
-String or Tape (or some material you have on hand to hold the paint/alternative to the card)
-A Pen 
-Playing Cards (optional)
-A Glue Stick
-Scissors

Step 1. 
Printout the printables below onto white cardstock and cut them out.

Step 2. 
If you use playing cards, glue the picture onto one side of each card with a glue stick and cut an equal-sized peice of white cardstock to glue to the other side (so the card is sandwiched in between). The card just reinforces sturdiness. Whether or not you use playing cards, the back is white. Write a message on the back with your pen (preferrably black gel ink, a simple message like "Happy Valentine's Day!") and sign your name. 

Step 3. 
Laminate the cards. 

Step 4. 
Tie, tape or somehow adhere the paint tubes (or alternative media) to the cards, preferrably with an adhesive that will not mess up the cards when removed. You are done! 


Here are the free printables:


If you have difficulty downloading them, just right-click, select 'Open image in new tab' and you can print it from the new tab from the right-hand corner options.

I hope you enjoyed this tutorial!

-Lauryn
Share this PostPin ThisEmail This

Saturday, February 15, 2020

Artistic Developmentally-Apropriate Valentines for Kids to Make (Tutorial)

Happy belated Valentine's Day! I am sorry this is late and not very useful for 2020. I nearly wrote this whole post yesterday, but I just couldn't upload the photos and finish it in time. I hope everyone had a great Valentine's. Here are some Valentine cards made by my friends that, according to my training thus far in art education, are appropriate for the preschool and kindergarten to early elementary school artistic stages of development.

I'll begin with preschool. My friend Morgan, who is three, loves trains, so that was his theme. If you want a young child (or anyone, actually) to  make valentines, they need intinsic motivation, so go with the theme the child chooses so long as it is appropriate. They may need some prompting. At the preschool ages, children need to experiment freely with a wide variety of media. They should not copy tutorials or simply color in coloring pictures (that is a whole discussion for another time), but should get a feel for various media and techniques while expressing themselves with as few limits as possible. For our valentines, Morgan cut out and tore paper, glued collages, used recycled cardboard (that was safe to use), colored and drew trains with pencils, painted trains with watercolor, and with supervision used perment marker on top of the recycled collages. We even tried to make cardboard hearts with string wrapped around it, but he got bored with that process quickly. In short, we used lots of media and made different kinds of valentines to not only hold his attention and make them fun, but also so he could continue using his imagination, fine motor skills, and grow more proficient at all different media (although he is advanced in artistic development and quite skilled at the media already). Just give your child lots of supplies, and supervise/prompt them as they create. I cut out the cardboard hearts to make the process more efficient (since their attention spans may not be very long at that age). After, write "Happy Valentine's Day", preferrably add a pun to go with the theme, and have the child sign in cursive, which is easier than regular writing. On our heart collages, I wrote "I love you from the bottom of my heart" with the "I love you" literally on the bottom part. I thought it was hilarious, but then again, I am easily amused by puns, especially when a fitting one just pops into mind like that one. I also added train whistles from Dollar Tree to go with them.


My friend Lillie made hers all on her own, but I thought they were great and wanted to share them. If you have a child at the elementary stage or at the point where they love to write, they could cut out hearts (she told me she used one of the cardboard hearts as a template to trace), write a message inside, and then add something such as pencils. If they don't like to write, then they could try one of the activities above or use a new medium. We washi-taped in glowsticks (which was her suggestion). Make sure that the child signs their name, preferrably in cursive since that is much easier to learn, more fun, and looks very pretty.


I hope these quick tips and ideas are helpful! I have some art history inspired valentines to share next! Thanks for visiting!

-Lauryn
Share this PostPin ThisEmail This