Showing posts with label disney. Show all posts

Tuesday, November 22, 2022

Handmade Mysterious Benedict Society Costumes (Disney Version)

 Hello everyone, it has been so long since I have had time to create a post. This is an overview of how I created our Mysterious Benedict Society group Halloween costumes this past October. It's not exactly a tutorial, but I will try to describe in summary how I made each. 


Cosplay inspiration:


Ours:

For Constance, I found the perfect plaid pattern on thrift store pajama pants, which I cut and sewed into a shawl (I basically just needed to hem and attach two rectangles). I used extra strips for hair bows. I also found a pink, long button-up shirt at the same store. I had to trim the sleeves, add plaid to the tips, and hem them. I hot-glued more of the extra plaid fabric to the buttons to make them match. I bought long white socks at Dollar Tree. That's all there was to it! 


For Mr. Benedict, we already had a hat and grey face paint, so I painted a beard and used Dollar Tree yarn to make hair. The shirts/jacket were thrift store finds, as was the tie. This costume was basically finding and matching up parts, it did not require much creating. 


For Reynie we bought a green sweatshirt at a thrift store, then my brother cut it into a vest and painted a gold trim. He had tan shirts, I got him long mismatched socks at Dollar Tree, and the shirt came from the thrift store, too. 


Finally, for Kate I bought a hat and jacket that were the right materials but wrong colors. I also found a striped shirt and orange-brownish pants. All of the thrift store supplies including those were bought at a big sale at our local Freedom Hill store. I mixed acrylic paints with fabric softener and painted the hat green, and all of the jacket. The jacket took many, many layers and several days since I had to wait for each layer and side to dry. 


I hope somebody who sees this costume idea knows what The Mysterious Benedict Society is unlike everybody we encountered on Halloween, and if you appreciate the series as much as I do, perhaps you'll find this idea useful for the future. 


Thanks for visiting!


-Lauryn 


Share this PostPin ThisEmail This

Thursday, May 21, 2020

Star Wars Gift in a Bag (DIY) Gift

Hi everyone! Today I'd like to share a quick gift tutorial from this past Easter that I made for my brother: a Star Wars 'Gift in a Bag'. Usually you see 'gift in a box', 'gift in a jar' and such, but I was in a situation where I had to use what I had, and I didn't have jars, baskets, or good boxes, but I had paper bags. This can, of course, be adapted into a jar gift, gift box or gift basket. Although this was made for Easter, this would make a great birthday gift, and could even be turned into a Christmas 'Star Wars in a Stocking' gift. This is super easy to out together. I literally ended up creating all of my gifts on Easter morning, using what I had. 
Basically, to create this you need a collection of Star Wars items you know the recipient will enjoy. These could be bought or handmade. If you have Easter eggs, you can put items inside them and create character faces with them. I made Yoda, C3PO, and Darth Vader. I hot-glued tissue paper on my eggs, added cardboard for the ears on Yoda and a cardboard helmet piece on Darth Vader with hot-glue, and painted them with layers of acrylic paint. I also used markers on top of the paint when it dried for details I think (I may have also painted those, though, I really don't remember), and used a metallic silver on Darth Vader. What you include in your gift depends, but if you are making the gift for somebody who enjoys art, you could include art supplies. I filled the eggs with homemade clay, and the sack in the photos below held acrylic paint tubes. I hand-painted a baby Yoda tee-shirt as well, but if you make this gift for somebody older clothes can be tricky and I tend to avoid clothing gifts. I actually don't know if the shirt would fit in a paper bag, although I think it would, because mine was still drying when I presented it. Like I said, it was very last minute. I would have liked to include more, but I was using what I had and didn't order online in advance. Some ideas might be Star Wars books (stories, parodies, puzzles, tutorial books and so on), accessories or socks, candy molds that you could use to make either treats or crayons with, notebooks, cooking gadgets, and countless other items. When you have all of your items, the last step is to create a label by printing out the Star Wars logo (which is easy to find on Google), glue it on a folded or cutout piece of card-stock with hot glue or a glue-stick, and write "Gift in a ____" ("Gift in a Bag" in my case), and attach the label on (I stapled mine onto the bag, but in a gift basket it would be tucked in, and in a jar it would be tied around the jar or glued onto the lid). That's all there is to it! If you create a similar gift, I encourage you to get creative and turn things you know that the recipient would love into Star-Wars-themed items. Remember, make everything cohesive and stick to a simple color palette.


I hope you enjoyed! I am not sure when I will be able to post in the coming few weeks due to my school workload, but I hope to continue posting weekly. I can't guarantee that, though. Thank you for visiting!

-Lauryn
Share this PostPin ThisEmail This

Thursday, March 26, 2020

Tangled Repunzal (21st) Birthday Party


Hello, everyone! I'm sorry I am posting this much later in the day than usual. Everything I had planned for today took much longer than expected. I have so much to share and catch up on. Today I'd like to share a birthday party that my littler little brother (who is eleven) put together for me in collaboration with my mother for my 21st birthday back in January. I love Tangled and Repunzal is not only one of my favorite characters, but the one character that I relate to in every single way; I mean, I am convinced she must be a fellow INFP personality type. At my first singing recital last year I also did "When Will My Life Begin" for one of my songs. My brother Will knew all of this, and so while I was at school he decorated as a surprise. He made a poster with printer and construction paper and markers. He made a long yellow paper chain to represent Repunzal's hair. He also made white paper chains. He handmade a paper lanturn like those in the movie and put a flashlight-type of device inside. He handmade a maze, too. With more paper he crafted Repunzal's tower and drew details with markers. He made a paper flower on a pipe-cleaner stem stuck in clay as a decoration representative of the magic flower. He made a wanted poster photo prop for photoshoots. On a railing at the top of our staircase, visible to anyone heading towards our kitchen/living room, he taped a sign on for "The Snuggly Duckling" which he had drawn with markers. My mother bought white flowers from Ingles and star balloons from Dollar Tree. What especially stood out to me was my brother's brilliant color scheme. Rather than doing a typical purple and golden palette or something similar, he chose a very unconventional palette of yellow, orange, gold and white. Another thing that stood out is how he made the decor very modern, stylish and subtle, such as doing a flower and lanturn but never showing an actual image of Repunzal or any logos or that sort of thing. I felt so proud of him. Anyway, below are some photos of the details: 


I hope you enjoyed! I am very excited to share more tutorials and events soon, including free printables, a "Sunshine in a Bag" gift, a Jurassic Park/World party, a Native American party, and more. I hope you will visit again soon!

-Lauryn
Share this PostPin ThisEmail This

Thursday, March 12, 2020

DIY Jack Costume (From "Mary Poppins Returns")


Hello, everyone! Today I am going to share a quick tutorial for one of the costumes I made last year for Halloween, which was Jack from "Mary Poppins Returns". This costume is super easy to make. 

My brother got the hat online, although I'm sure it could be paper-mached. I found the coat and pants at a thrift store, although I got quite a few before I found one that fit right, and I had to sew the pants smaller. I found a red vest at a thrift store with a zipper, cut the zipper out, hemmed it, cut button holes with scissors or an exacto knife, and sewed buttons on. For the scarf, I found a short red scarf or bandana type of thing at a thrift store and painted the black swirls on  with acrylic paint. The white undershirt was also from the thrift store. Because we live in Georgia and Jack wears so many layers, I think I had to modify the shirt by making it short-sleeved or something so that he wouldn't die of heat. Basically, the costume was just a lot of searching and modifying, which in this case was cheaper than making it from scratch. Fancy suits, plain white shirts with collars and vests are all very common at thrift stores, it's just a matter of knowing which ones carry them for cheap. If you live in Georgia, definitely try the Cleveland Community Thrift Store. If I remember correctly, that's where all of my costume parts for this came from. 
That's all there is to it! 


I hope you enjoyed this random post and find it a useful resource in the future. I look foward to sharing more tutorials and events soon!

-Lauryn
Share this PostPin ThisEmail This

Tuesday, July 2, 2019

Morgan's Lightning McQueen 3rd Birthday Party


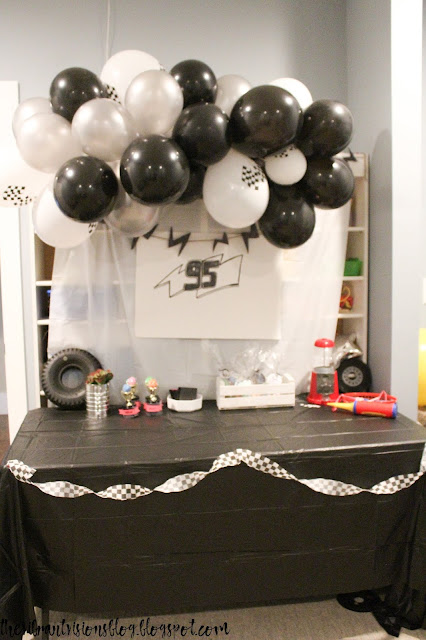
Here's another party from back in March. This one was a surprise party for my friend Morgan who loves Lightning McQueen. The palette was mainly black,white and silver with pops of red. I had a lot of help with the balloon arch, which took around six bags of balloons. I made the lightning-strike banner with hot-glued construction paper on a string. I hand-painted the posters. The race car streamers were from Hobby Lobby, as were the matching flag balloons. I made the trophies with hot-glues plastic cups that were painted black, trophies from Dollar Tree, construction paper and marker. I didn't have anything to put in them, so I finally resorted to sticking random pom-poms in. The other favors included chalk and notebooks. He had a blast! In addition to chalk-drawings, balloons, and Play-Doh activities, we made lots of balloon animals (and objects) with the long, twist-able balloons.


I look forward to sharing more soon!

-Lauryn

Share this PostPin ThisEmail This

Thursday, October 25, 2018

Easy DIY Belle Costume


Halloween is right around the corner, and as you may know, I love to create costumes. Preferably elaborate ones. However, I always seem to find myself sewing and gluing at the last minute and I know most people love a simple but elegant costume. If you find yourself or someone you know scrambling for a costume at the last minute, this is a great choice. I've seen lots of Pinterest ideas for Belle costumes, so here is my own version listed in more detail below:

For the costume you will need:
-A light blue shirt (I cut the sleeves off of a tee-shirt I had)
-A white, button-down, long-sleeved shirt.
-An apron. I handmade mine for my Alice costume.
-A light blue (puffy/circle-shaped) skirt, the same shade as the shirt. They could also be medium blue. Mine was from a thrift store.

Put those items together, and easy as that you have a Disney princess costume!


Best of all, it costed me about $2, which isn't too terribly expensive. I hope you enjoyed! I look forward to sharing more costume tutorials with you!

-Lauryn
Share this PostPin ThisEmail This